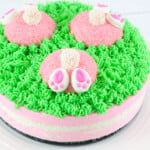
Bunny Butt Cheesecake
This adorable No-Bake Bunny Butt Cheesecake is a delicious Easter dessert with the cutest little bunny butt decorations on top made from Snoballs.
Servings: 8 slices
Ingredients
For The Crust:
- 1 1/2 sleeves Graham Crackers
- 1 tsp Sugar
- 6 Tbsp Butter melted
- Food Coloring Aqua/Teal
For The Cheesecake:
- 4 8 oz. packages Cream Cheese
- 1 1/2 cups Heavy Whipping Cream
- 1 cup Sugar
- 1/2 cup Powdered Sugar
- 2 tsp Vanilla
- Food Coloring Pink
To Decorate:
- 1 large container Vanilla Frosting
- Food Coloring Green
- 1 package Snoball Cupcakes from Hostess Brand
- Wilton Candy Bunny Feet
- White Chocolate to melt
- White Nonpareils
Instructions
- In a small bowl, place the Butter, and melt it in the Microwave. Place the Graham Crackers in a Food Processor or Blender, and pulse into crumbs. Sprinkle Sugar over Crumbs, and pulse to blend. Pour melted butter over the crumbs and pulse to blend/coat. Take the lid off of the Food Processor/Blender, and add several drops of the Aqua/Teal Food Coloring Gel to the Crumbs, replace the lid, and pulse to blend. Continue to add a little more Food Coloring Gel until the desired color is achieved. Line the Bottom of a 7-inch Spring-form pan with Parchment paper, and press the Graham Cracker Crumbs into the bottom of the pan, evenly, smoothing with a spoon. Place the pan in the freezer
- In the mixing bowl of a stand mixer, place the Heavy Cream, Sugar, and Vanilla, and whip with the Whisk attachment until stiff peaks form and the Cream is whipped. Add the Cream Cheese, one at a time, and the 1/2 cup of Powdered Sugar, and blend until smooth and fluffy. Remove 1/3 of the Cheesecake Batter to a dish, and place it in the refrigerator. (This is the White - middle layer) Add several drops of the Pink Food Coloring Gel to the Batter in the mixer, and mix well. Add more if needed, until the desired color of Pink is achieved.
- Remove the Pan from the freezer, pour or spoon 1/2 of the Pink Cheesecake Batter into the Spring-form pan, and place it back in the Freezer. When the Pink Batter is firm to the touch, about 2 - 3 hours, remove the White layer of Cheesecake Batter from the refrigerator, pour it on top of the Pink Layer, and place the pan back in the Freezer, until the White layer is set, 2 to 3 hours. When the White layer is firm to the touch, remove the remaining Pink Cheesecake Batter from the refrigerator, and pour the Pink layer on top of the White layer, and place the pan back in the Freezer, overnight for best results.
TO DECORATE:
- Remove the Frosting from the container to a bowl, add the Green Food Coloring Gel, and stir, until you get a color that resembles green grass. Place the Tip in a Pastry bag, and fill the bag with Green Frosting. Using the bag/tip, pipe the Frosting onto the cheesecake in small short upward strokes - you may need to practice a little with the tip; place a piece of Parchment Paper on the counter, and pipe the Frosting onto the Parchment to practice with the tip - you can just place the Frosting back into the Pastry bag when finished. Build up the Grass, by piping one layer on top of another, and using about 3 layers total. Using a sharp, thin, serrated knife, cut the ends off of the Snoball cupcakes, making the Bunny Butts. Place the Sno-ball cupcake ends on top of the Grass - See photos for placement.
- Place the White Chocolate - melting chocolate - in a small dish, and melt it in the microwave. (you only need about 1/4 cup melted White Chocolate) Dip the Bunny Feet in the White Chocolate, only barely dipping the NON-DECORATED SIDE of the Feet in the Chocolate - you only need enough to make them stick on the Cupcakes. Place the Bunny Feet, one at a time, on the Cupcakes - see photos for placement.
- Place the White Nonpareils in a shallow dish, Dip one Mini Marshmallow in the White Chocolate, immediately into the Nonpareils, and stick on the Cupcake, using the Photos as a guide for placement. Continue with the other two Mini Marshmallows, and add them to the Cupcakes. With the Piping bag, go around the Cupcakes, placing grass around the edges, to make the Bunny Butts look as if they are burrowing into the Grass - See Photo. Place the Cheesecake back into the Freezer until time to serve. Do not remove the Spring form until time to serve.
- When ready to serve, slice the Cheesecake into 2-inch pieces. Serve, and Enjoy!