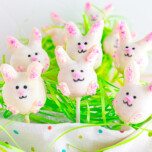
Easter Cake Pops
These Easter Cake Pops are not only adorable, they are delicious too. The inside a delicious cake mixed with cream cheese frosting, then coated with white chocolate and decorated to look like the Easter Bunny!
Servings: 15 pops
Equipment
- black edible food marker
- kitchen shears
- lollipop sticks
- foam block or styrofoam for cake pops to set
Ingredients
- ½ cup butter unsalted, room Temperature
- ¾ cup sugar granulated
- 2 eggs
- 2 tsp vanilla extract
- 1 cup all-purpose flour
- 1 tsp baking powder
- ½ tsp salt
- ¼ cup cream cheese frosting whipped, more if needed
- 14 oz. white candy melts
- pink sanding sugar
- mini marshmallows pink and white
Instructions
- Preheat oven to 350 degrees. Prepare an 8-inch round cake pan with parchment paper. In a stand mixer with the paddle attachment beat butter for 15 seconds until smooth then add sugar and beat at medium speed for 5 minutes until light yellow in color. Add the vanilla extract and eggs 1 at a time and mix on low speed until combined. Whisk together the flour, baking powder, and salt in a medium bowl. Slowly add the dry ingredients to the wet ingredients and mix until combined.
- Transfer the batter to the prepared cake pan. Bake for 25 minutes or until a cake tester comes out clean and the cake is golden in color. Allow the cake to cool for 40 minutes before making the cake pops.
- When the cake is cool you can either use a food processor or your hands to create cake crumbles in a large bowl. Next, add the cream cheese frosting and mix to combine with the cake crumbs. The mixture should hold together securely with no dry crumbs visible. Using a medium cookie scoop portion cake pops and shape mixture into round balls between your palms.
- Create ears by molding a small amount of the mixture into a ball and then rolling the ball into a sausage shape. Shape it into a bunny ear and mold it with your fingers into the cake pop. Repeat with the second ear. Continue with the remaining cake pops and transfer them to a container and chill in the freezer for 15 minutes.
- In a small deep microwave-safe container, melt the candy melts in 20-second increments until smooth, stirring in between heating. When cake pops are chilled remove them from the freezer and transfer them
- to the refrigerator. Remove a cake pop from the refrigerator (leave the others to chill as you work
- on 1 at a time).
- Dip a lollipop stick in the warm chocolate and then insert it into the base of the bunny. Next dip the entire pop into the chocolate ears side down until the pop is fully coated. No cake should be exposed. Allow the excess chocolate to drip back into the container. Insert the stick into the foam block to allow the chocolate to set. Repeat with the remaining cake pops and melt chocolate in 20-second increments as needed to ensure a smooth application. Once all the cake pops have been coated and set it's time to add the details.
- Using a piping bag or cocktail stick add lines on the ears with melted chocolate and then immediately dust with pink sanding sugar. Next, pipe or use a cocktail stick and add feet to the bottom of the cake pop. Add a little sanding sugar to the top and bottom of the paws. Using an edible ink marker add eyes to the cake pop. Use kitchen shears or a small knife to cut a bunny nose from a pink mini marshmallow. Attach it to the cake pop with a bit of warm chocolate.
- Use the edible marker to complete drawing the bunny's mouth. Finally, add a small amount of chocolate to the lower back of the cake pop and add a white mini marshmallow to create a bunny tail. Use a cocktail stick
- to coat the marshmallow with chocolate and add a “furry” texture. Allow cake pops to set and enjoy!