
This easy sourdough starter recipe offers a detailed day-by-day guide so you know exactly what to expect. It makes sourdough simple enough for anyone, and all you need is water, flour, and a clean glass jar to get started.

I have officially jumped on the sourdough train. In fact, I’ve been on the train for a while and have even shared a few of my favorite sourdough recipes, like homemade sourdough bread, sourdough sandwich bread and sourdough rolls.
But before you can make any of that, you need an active sourdough starter. Today I’m sharing all of the tips and tricks I’ve learned since I started experimenting with sourdough, as well as the foolproof method and my easy sourdough starter recipe.
Keep in mind that a sourdough starter requires at least 7 days, and usually more like 10 days, before it’s ready to use. But once you have a starter, you can keep it going forever and have it ready to go whenever the urge to bake arises.
Be sure to read it all the way to the end of the post before starting because I’ve included lots of tips and troubleshooting to help you avoid my mistakes. Remember that sourdough is less about following rules and more about paying attention. If you stay consistent, keep it warm, and watch how it behaves, you’ll learn exactly what your starter needs. And once you understand that, everything else becomes easy.
Why This Sourdough Starter Recipe Is Great For Beginners
- No guesswork. There’s no specific timeline to chase with this recipe or guessing if the starter is ready. Instead, I teach you exactly what to look for and what the different things you may observe mean. That makes the process of making a sourdough starter much more reliable.
- Built from real experience. This sourdough starter recipe follows the exact process I use in my own kitchen. I’ve done plenty of trial and error so you don’t have to.
- Simple and repeatable. One thing I didn’t love about many sourdough starters is that every day was different and there was so much to keep track of. This recipe simplifies all of that with the same feeding ration and the same method the entire time. There are no complicated adjustments needed in the beginning either.
A Note Before You Start
Every sourdough starter behaves differently. Your kitchen’s temperature, humidity, season, flour type, and even the natural bacteria living in your home will all affect how your starter grows. That means that your starter may not follow the exact same timeline as mine, and that’s completely normal and okay.
My advice to you is that instead of watching the clock, learn to watch the starters rise, bubbles, smell, and texture.
What Is A Sourdough Starter?
Sourdough starter is what you see everyone keeping on their counter in a jar to make sourdough-anything. It’s simply fermented yeast made from flour and water. Wild yeast and bacteria is trapped in the jar, feeds on the sugar in the flour, and ferments. Think of it as the homemade version of yeast packets at the store. When it’s added to recipes, it makes the dough rise, just like regular yeast, but it also adds that tangy sourdough flavor.

What You’ll Need
The only ingredients needed to make this sourdough starter recipe are wheat flour and water, but there are also a few tools you’ll want to have handy. Be sure to check out the recipe card for the full list of everything you’ll need and the measurements.
- Kitchen scale – Measuring the flour and water on a scale is important when it comes to feeding the starter, as too much or too little of either will affect the fermentation process.
- Glass jar – An 8 to 12-ounce glass jar is where you’ll want to keep your starter. Be sure to have a second clean jar available for later in the process.
- Loose-fitting lid – The jar shouldn’t be tightly sealed like a canning jar.
- Rubber band – A large rubber band that fits around the jar is key so you can keep track of where the starter was and know how much it’s risen.
- Whole wheat flour – Whole wheat flour is the best choice for starting because it contains more natural yeast and nutrients. You can also use all-purpose flour, which has a slower start but works, or rye flour, which has an even faster fermentation compared to whole wheat flour. Bread flour can be used later, once the starter is established, but not in the beginning. My recommendation is to start with whole wheat flour and then transition to another type of flour.
- Water – Water hydrates the flour and activates fermentation. Lukewarm water helps encourage microbial activity. Use filtered water if your tap water is heavily chlorinated. Bottled water is also a safe alternative. Avoid using very hot water because it can damage developing microbes. The ideal water temperature is 70°F–80°F (21°C–27°C).
- Your active starter (once established) – Once your starter is active, it will become the base of all future feedings because it carries the yeast and bacteria that make sourdough work and make your bread rise.
A Note on Flour & Water Variations
Keep in mind that switching flours will change your starter’s behavior. Rye flour creates faster, stronger fermentation. Bread flour develops stronger gluten later (good once established). All-purpose flour produces a milder flavor.
The amount of water used is also important. Adding slightly more water creates a looser, faster-fermenting starter. Slightly less water creates a thicker, slower-fermenting starter.
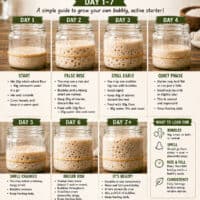
How To Make A Sourdough Starter (Day-by-Day Breakdown)
Let’s take a look at each day of the starter process, including what to bubble sizes and smells to expect.
Your Simple Daily Routine
Keep 30g starter. Add 30g flour and 30g water. Mix. Watch what happens. That’s it.
Day 1: Mix Your First Starter


In a small jar, combine 30g of whole water flour and 30g lukewarm water. Mix until it forms a thick paste consistency. Place the rubber band at the level of the mixture and place a loose-fitting lid on it.


Place the mixture somewhere warm and stable. Some of my favorite locations are on top of the fridge, inside the oven with the light on (and the oven off), or near a warm appliance. It should be somewhere slightly warm but not hot, as you don’t want to cook the mixture.
Day 2: Watch for the “False Rise”
At some point on the second day, the starter will likely double or even triple quickly and then fall. There might be large, uneven bubbles and a stinky smell or a gray, dark, or slightly discolored layer on top.


This is completely normal and called the false rise. It’s caused by different bacteria in the mixture becoming active before the starter stabilizes. They produce gas quickly but are not sustainable long-term.
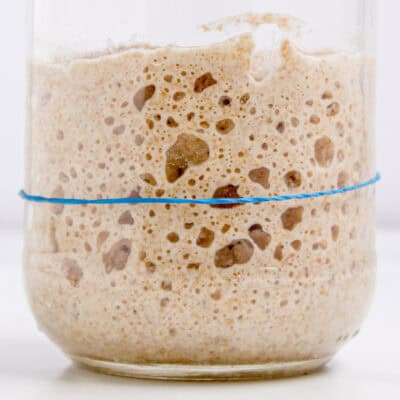
When the starter rises and then falls, leaving marks on the jar, that means it’s active and has completed a healthy fermentation cycle.


Transfer 30g of the starter to a clean jar. Add 30g flour and 30g water. Mix them together until there’s a smooth mixture.
Discard everything remaining in the other jar in the trash – it has bad bacteria, doesn’t taste good, and isn’t ready for recipes.
Day 3: Another Big Rise (Maybe)
The starter might double or triple again, with big and small bubbles. This is simply a sign that you’re in the early development phase and the good bacteria is starting to take over.


Repeat the same process as yesterday by transferring 30g of starter to another clean jar, adding 30g flour and 30g water, and discarding the rest.
Day 4: The “Quiet Phase”
On day 4, expect only a small rise, fewer bubbles, and a mild fruity or slightly sour smell. This is when the starter begins to stabilize, become more acidic, and build the right environment for yeast.

Repeat the daily process of keeping 30g starter, feeding it 30g flour and 30g water, and discarding the rest.
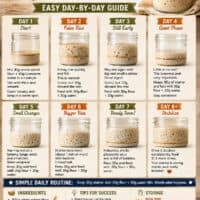
Day 5: Smell Changes and Small Rise
Around day 5, you might notice a lemony, tangy smell and a cleaner, fresher aroma. This is a great sign that means that the starter is developing healthy bacteria and balanced fermentation.

Repeat the daily feeding process.
Day 6: Bigger Rise
Around day 6, the starter will begin to rise more noticeably, about 1 inch or more above the rubber band. There should be a mix of bubbles throughout.

Continue transferring 30g of starter to a new jar, feeding it 30g flour and 30g water, and discarding the rest.
Day 7: The Breakthrough Moment
Things start to get exciting around day 7! This is when the starter is almost ready to start using. It’s ready to use when it doubles in size consistently, rises and falls in a predictable pattern, smells pleasantly sour (but not harsh or rotten), and looks airy and full of bubbles.

Repeat the daily feeding process.
Day 8: One Last Step (Don’t Skip This)
As tempting as it may be to use the starter as soon as it meets the criteria described on day 7, it’s not quite ready. Once it starts doubling consistently, feed it 2 to 3 more times before using it. This ensures that it performs reliably when you start baking with it.

What Is Sourdough Discard? When Can I Start Using It?
Sourdough discard is what’s left in the jar after you transfer the starter out and is what’s used to make many recipes.
At first, your discard is not going to be usable. The starter needs to be active and consistently doubling for at least 3 to 5 days before the discard is good to use. After that, the sourdough discard can be used to make things like pancakes, waffles, crackers, flatbreads, muffins and more. One of my favorite things to make with sourdough discard is sourdough sandwich bread.

How to Read Your Starter
Simply observing your sourdough starter and paying attention to the size of the bubbles, the smell, and how much it’s rising can tell you a lot. Here’s a quick overview of what may be happening and what it means.
- Big bubbles early: This is normal early activity. Keep feeding it.
- No rise: This is common in the transition phase. Keep feeding it. The room temperature may be an issue.
- Small and big bubbles mixed throughout: This means healthy development. You’re right on track!
- Tangy or lemony smell: This is a great sign that means good bacteria is forming. Progress is happening!
- Consistent doubling: It’s ready to use!

Common Beginner Mistakes To Avoid
Here are a few of the most common mistakes I’ve seen when making a sourdough starter.
- Feeding based only on time instead of growth. As I mentioned at the beginning of the post, every sourdough starter behaves a little differently due to many factors. For this recipe, it’s important to watch the rise and not just the clock. Your starter might double in 6 hours or 24. Both can be normal.
- Giving up during the quiet phase. Many people give up on their starter around day 4 because they think the fact it doesn’t rise much after doubling or tripling previously means something went wrong. This is actually where the magic is happening and the starter is beginning to stabilize.
- Keeping a dirty jar. The starter should be transferred to a new jar every day. A clean environment reduces the risk of mold and keeps fermentation controlled.
- Sealing the lid too tightly. Some air is required for the fermentation process. It’s best to keep the jar covered but not sealed tightly like you would a canning jar.
- Using the discard too early. I completely understand the excitement of wanting to start baking with the sourdough discard! But the starter needs to be consistently doubling before it’s ready to use. Otherwise, it won’t work properly and will taste terrible.
- Not using a rubber band. Every time you transfer the starter to a new jar, use a rubber band to mark where it is. This gives you a clear visual of its growth, which is more reliable than guessing.
How Often Do You Feed an Active Sourdough Starter?
Once you have an active sourdough starter that is consistently doubling, think of it as a living thing that needs to be kept alive.
If you bake frequently and will be using the discard often, you’ll want to continue with basically the same process as beginning the starter. Keep it on the counter, feed it daily with flour and water, and keep the jar clean. You don’t necessarily need to keep transferring jars daily; just use a spatula to scrape down the edges of the jar to keep it clean.
If daily maintenance sounds overwhelming, don’t worry. There’s another option!
Once you’ve followed the steps in this sourdough starter recipe and have an active starter, you can store it in the fridge. This slows down the fermentation process significantly. You do still need to feed it so it stays strong and will rise when used, but that can simply mean feeding it once a week. I personally like to feed my starter the night before I plan to bake with it.

FAQs
Here are a few of the top questions I’ve received about this easy sourdough starter recipe.
When your starter rises and then falls, leaving marks on the jar, it means it’s active and has completed a healthy fermentation cycle. Once it falls, it’s simply hungry and ready to be fed again.
That’s known as a false rise, which is normal early bacterial activity.
It’s entering the stabilization phase. Keep feeding. This is temporary.
It is ready to bake when it doubles consistently and smells pleasantly sour. This is usually after about 10 to 14 days.
Sure! Only do this after it consistently doubles in size. Keep in mind that different types of flour ferment at different speeds and offer a different flavor.
It’s probably hungry. Once you feed it with flour and water, the smell should go away.
Storing a Sourdough Starter
- Room temperature: If you bake at least a couple of times a week, you can keep your active starter on the counter. It will ferment faster and stay more active and bubbly, ready to be used at any time. Just keep in mind that you’ll need to continue to feed it daily and keep it loosely covered.
- Refrigerator storage: If you bake less frequently, you can keep the sourdough starter in the fridge once it’s become an active starter. (Do not keep it in the fridge until you’ve achieved consistent doubling several days in a row.) Feed is about once a week to keep it active. I usually feed it the night before I bake a loaf of bread.
Easy Sourdough Starter
Ingredients
- 300 g Whole wheat flour (2 1/2 cups)
- 300 g Lukewarm water (1 1/4 cups) 70°F–80°F (21°C–27°C)
Instructions
Day 1: Mix Your First Starter
- In a small jar, combine 30g whole wheat flour and 30g lukewarm water. Mix it until it forms a thick paste. Place a rubber band at the level of the mixture so you can easily track its growth as well as a loose-fitting lid on it.
- Place your mixture somewhere warm and stable: I sometimes place it on top of the fridge, inside the oven with the light on (oven off), or near a warm appliance. Aim for a cozy, slightly warm spot, one that is not hot. We don’t want to cook the mixture.
Day 2: Watch for the First Rise (The "False Rise")
- At some point, you may notice your starter doubles or even triples quickly and then falls. You might see large, uneven bubbles and a stinky smell. You might also see a gray, dark, or slightly discolored layer on top.
- What's happening: This is called a false rise. Early on, different bacteria inside the mixture become active before your starter stabilizes. They produce gas quickly, but they're not the ones we want long-term.
- When your starter rises and then falls, leaving marks on the jar, it means it’s active and has completed a healthy fermentation cycle. Once it falls, it’s simply hungry and ready to be fed again.
- When you see that early rise, scoop out and keep 30g of starter and transfer it to a clean jar. Add 30g flour and 30g water, then mix them all until you get a smooth mixture. Throw the mixture you scooped out in the trash.
- Why trash the discard at this stage: Your starter isn't stable yet. The early mixture has bad bacteria, doesn't taste good, and isn't ready for recipes. It's still developing its balance.
Day 3: You May See Another Big Rise
- Your starter might rise quickly again (even triple) and have both big and small bubbles. This means you’re still in the early development phase, but improving. At this point, the good bacteria are starting to take over.
- What to do: Repeat the same feeding: 30g starter, 30g flour, and 30g water. Discard the rest.
Day 4: The "Quiet Phase" (Super Important Stage)
- Now at this point things may change. You might notice only a small rise (or almost none), fewer bubbles, and a mild fruity or slightly sour smell.
- What this means: This is the most important stage. Your starter is stabilizing, becoming more acidic, and building the right environment for yeast. It may look like it's slowing down, but it's actually improving!
- What to do: Stay consistent. Keep 30g of starter and feed it 30g flour and 30g water.
Day 5: Smell Changes and Small Rise
- As you continue feeding, you may notice a lemony, tangy smell and a cleaner, fresher aroma. This is a great sign. Your starter is developing healthy bacteria and balanced fermentation.
- What to do: Keep 30g of starter and feed it 30g flour and 30g water.
Day: 6 Bigger Rise
- Eventually, your starter will rise more noticeably, reaching 1 inch or more above the rubber band, and show a mix of bubbles throughout.
- What to do: Keep 30g of starter and feed it 30g flour and 30g water.
Day 7: The Breakthrough Moment
- You’ll know your starter is ready when:
- It doubles in size consistently
- It rises and falls in a predictable pattern
- It smells pleasantly sour (not harsh or rotten)
- It looks airy and full of bubbles
- What to do: Keep 30g of starter and feed it 30g flour and 30g water.
Day 8: One Last Step (Don't Skip This)
- Once it starts doubling consistently, feed it 2 to 3 more times. This strengthens it so it performs reliably when you start baking with it.
Last Step:
Please leave a rating and comment letting us know how you liked this recipe! This helps our business to thrive and continue providing free, high-quality recipes for you.Notes
Nutrition


Leave a Review!
We LOVE hearing from you! Submit your question or comment here.
Your email address will not be published.
1 thought on “Easy Sourdough Starter Recipe”
Why are these recipes given in grams? Please just continue to use basic American baking measurements . That’s what the majority of us want!!
Thank you!