


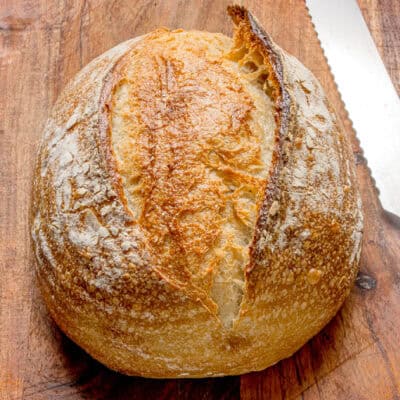
Made with an active sourdough starter, pantry staples, and a simple process, this Sourdough Bread recipe is perfect for beginners and first-time bakers. It can be made in a single day or split over two days, and there are no complicated techniques required.

Like most people, bread is the first thing I started making once I had an active sourdough starter. I actually started with sourdough sandwich bread, which is made with sourdough discard and still requires yeast, and sourdough rolls. But then I started a mission to make a classic sourdough bread recipe that uses only sourdough starter (no yeast) and is easy to make.
I’m happy to say I’ve found it. This easy sourdough bread recipe is perfect for beginners because it skips all of the complicated techniques and extra steps found in some recipes. It does still take a good bit of time to make, but about 90% of that is hands-off time. A long rise time is just part of the sourdough experience! I do love that I can prepare this all in one day or start it the night before and still have freshly baked bread for dinner. It’s perfectly dense yet tender, holds up well, and has that signature sourdough flavor. So good!
Why This Is The Best Sourdough Bread Recipe
- Simple process. This sourdough bread recipe is great for beginners because it doesn’t require any complicated techniques or special equipment. All you need is a sourdough starter, water, flour, salt, and a Dutch oven.
- No kneading. Instead of kneading, this bread is made with a simple stretch and fold technique. It’s much easier and faster, and doesn’t require a mixer or lots of effort.
- Works on your schedule. This recipe can be made in one day or spread across two days because the bulk fermentation (first rise) can be done in several hours at room temperature or overnight in the fridge. I include a few timeline examples to show you how you can fit the process into your dough.
What Is Sourdough Bread?
Sourdough bread is simply bread made with an active sourdough starter instead of packaged yeast. The starter acts as the leavening agent and adds the signature tangy sourdough flavor.

Key Ingredients
This beginner sourdough bread recipe is made with just a sourdough starter and three other very basic ingredients. Be sure to check the recipe card at the end of the post for the exact measurements.
- Flour – Flour gives the bread structure, holds gas from fermentation, and determines your texture. Bread flour is the best option as it’s higher in protein and gives the bread the best structure and rise. However, all-purpose flour also works and gives you a slightly softer crumb. For a heartier loaf, use up to 20-30% whole wheat flour or a blend of all-purpose/bread flour and whole wheat for flavor and structure.
- Water – Water hydrates the flour and allows gluten to develop. It also controls how open or tight your crumb is. Warmer water speeds up fermentation and cooler water slows it down. You can reduce water slightly if the dough feels too sticky (especially when starting out).
- Sourdough starter – It is a natural leavening agent. It makes the bread rise and gives it a tang. A strong starter creates air pockets, adds flavor, and drives fermentation. You can make your own starter in about a week or buy one.
- Salt – Salt strengthens gluten, controls fermentation, and enhances flavor. Without it, your bread will taste flat and ferment really quickly. Fine sea salt or kosher salt both work.
How Do I Know If My Sourdough Starter Is Ready To Use?
A strong starter is key to this recipe. It should be doubling in size regularly, usually within 8-12 hours of being fed. If it’s been a while since you’ve fed it, especially if stored in the fridge, you may want to feed it twice a day for 2 days or so before beginning this recipe. A starter that isn’t fully active will result in dense bread that doesn’t rise properly.
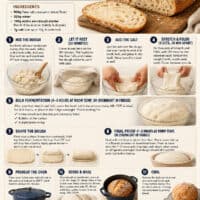
How To Make Sourdough Bread
This recipe works great for beginners because it requires no kneading and can be done in a single day or across 2-3 days. The printable instructions can be found in the recipe card below.


- Make the dough. Add the sourdough starter and water in a bowl. Whisk until it appears milky, then add the flour. Mix until everything is combined. It will look shaggy and messy.


- Let it rest. Cover the bowl and let it rest for 30 minutes.
- Add the salt. Sprinkle the salt over the dough and use your hands to work it in. I like to pinch, fold, and then press the dough into itself.


- Stretch and fold. Grab the top of the dough, stretch it up and fold it over the center. Repeat with the bottom and then each side. Cover and let it rest for 30 minutes. Repeat the entire process three times. The dough should be smoother and stronger each time.


- Bulk fermentation. Bulk fermentation simply means the first rise. After the last stretch and fold, cover the bowl. Let it rise for 4-6 hours at room temperature or overnight in the fridge. It should visibly increase in size (though not double like yeast dough would), have noticeable bubbles on the surface, and a slight dome on top.


- Shape the dough. Lightly flour the dough and work surface. Turn the dough out then carefully shape it into a rectangle. Fold the top third dough, then fold the bottom third up and over it. Turn it 90 degrees and roll it up like a burrito. Apply gentle tension as you go but don’t crush the air out.


- Final proof. Dust the dough with rice flour or gluten-free flour. Place it seam-side up in a banneton or bowl lined with a lightly floured towel. Let it proof at room temperature for 1-2 hours or refrigerate overnight. It should spring back slowly when you poke it.
- Preheat the oven. Place the Dutch oven (with the lid) in the oven. Preheat to 450F for at least 30 minutes, so it’s fully hot.


- Score and bake. Transfer the dough to parchment paper. Slash the top at a 30-45 degree angle and about ¼ inch deep. Place it in the Dutch oven. Bake covered for 30 minutes then uncover and bake for another 20 minutes, until it’s deep golden brown and the internal temperature is 205-210F.
- Cool. Transfer the sourdough bread to a wire rack. Let cool for at least an hour before slicing.

Timeline for Baking Sourdough Bread
This beginner sourdough bread recipe offers two options for making it. It can be done in a single day or it can be spread across 1-2 days. It can feel confusing at first and hard to line the timelines up with real life and not be baking at midnight, so here’s a guide.
Option A: All in one day
- The night before: The night before you want to bake, feed your sourdough starter so it’s freshly fed and fully active.
- 8 am: Make the dough and let it rest for 30 minutes before adding the salt.
- 8:30am: Begin the 3 rounds of stretching and folding.
- 9:30am: After the third stretch and fold, cover the bowl and leave it somewhere warm for bulk fermentation.
- 1:30pm-3:30pm: Check to see if the dough has risen appropriately. Shape it and begin the second proof.
- 3:30pm-5:30pm: Once the bread passes the “poke test” after the second proof, preheat the oven, transfer and score the bread, and bake.
- 4:30pm-6:30pm: After the bread bakes, allow it to cool for an hour and then enjoy!
Option B: Overnight
- In the morning: Feed the starter.
- In the evening: Make the dough, stretch and fold (x3), cover the bowl, and refrigerate.
- The next morning: Shape the dough. Allow it to proof for 1-2 hours (or all day in the refrigerator), until it passes the poke test.
- Late morning (or evening): Preheat the oven, transfer and score the bread, and bake. Let cool for an hour before enjoying.

Why Is My Sourdough Bread Dense or Flat?
There are a few common mistakes that can lead to this beginner sourdough bread recipe ending up dense or flat.
Dense sourdough is usually caused by not enough fermentation time, a starter that isn’t active or fed properly, or dough that’s been handled too roughly during shaping. To avoid this, don’t rush the bulk fermentation process and make sure to feed your starter several hours before beginning the recipe (and that it doubles in that time). Then, take care to fold and stretch the dough and work gently, especially when shaping it.
Flat sourdough bread is typically caused by dough that’s been overproofed (left too long in the final proof) or that didn’t have enough surface tension during shaping. Depending on your kitchen, the final proof may be as short as an hour, so be sure to check it with the poke test then.

Tips for the Best Bread
Before you get started, take a few minutes to read through these helpful tips.
- Use an active starter. Be sure to feed your starter 4–8 hours before you begin. If it’s not bubbly and doubled from feeding, your bread won’t rise properly.
- Watch the dough, not the clock. Just like a sourdough starter performs differently in each kitchen, so does this sourdough bread. Depending on the temperature of your kitchen and other factors, it may take more or less time for the bulk fermentation and final proof. Pay attention to the increase of size in the dough and the texture more than the exact time.
- Don’t expect the dough to double. Unlike yeast dough, this sourdough dough will not double in size during either proof. If it does double, it’s likely in the over-fermentation stage. A 50% increase in size is just fine.
- Rest the dough if needed. If the dough resists shaping and tightens up, let it rest for 10 minutes and try again.
- Score the dough. Scoring the dough is not just for decoration. It actually impacts the final texture of the dough and how it bakes, so don’t skip it. Be sure to use a razor or very sharp knife and cut about ¼ inch deep.
- Check internal temperature. The best way to ensure this sourdough bread is ready is to use an internal thermometer at the end of baking at the end of baking. 205–210°F means it’s fully baked.
- Cool before slicing. Let the sourdough loaf cool for at least an hour before slicing. Slicing it immediately will result in gummy sourdough, which no one wants.
- Do I really need a Dutch oven? A Dutch oven really helps the baking process. However, you can also bake the bread on a tray with added steam.

Ways To Enjoy It
One of the joys of this easy sourdough bread recipe is that there are so many ways to enjoy the finished product.
Slice it to make a thick, extra-tasty grilled cheese sandwich or load it with sliced meat and your favorite toppings.
Slather it with butter and enjoy it in place of dinner rolls or pop it in the toaster in the morning.
It’s also fantastic for soaking up every bite of broth or sauce, so I love to serve it as a side dish to our favorite soups and pasta dishes, like slow cooker beef stew, chicken noodle soup, and chicken parmesan pasta.
Proper Storage
- Room Temperature: Store homemade sourdough bread in a paper bag or wrapped in a towel. It will keep well for 2–3 days. Avoid putting it in airtight containers; they tend to soften the crust.
- Freezing: While I don’t recommend refrigerating the bread because it dries it out, it does store well in the freezer. Slice the bread then wrap it tightly and freeze it for 2–3 months.
- Reheating: Toast the slices directly from frozen, or warm a whole loaf in the oven at 350°F for 10–15 minutes.
Sourdough Bread
Ingredients
- 500 grams flour all-purpose or bread flour
- 325 grams water
- 100 grams active sourdough starter [fed 4–8 hours prior, bubbly and at peak]
- 7 grams salt I use 7g, but you can go up to 10g if you prefer
Instructions
Step 1. Mix the Dough
- In a bowl, add your sourdough starter, then the water. Whisk until it looks milky. Add your flour and mix the ingredients until everything is combined. It’ll look shaggy and messy.
Step 2. Let It Rest (30 Minutes)
- Cover it and let it sit for 30 minutes. This step hydrates the flour fully and makes the dough easier to work with later.
Step 3. Add the Salt
- Sprinkle salt over the dough. Use your hands to work it in: I like to pinch, fold, press it into itself. Make sure it’s mixed in well.
Step 4. Stretch and Folds (3 Sets, 30 Minutes Apart)
- Do 3 rounds of stretching and folding, with 30 minutes rest between each.
- For each round: grab the top of the dough, stretch it up and fold it over the center. Then do the same with the bottom, then each side. You’re working the dough like a compass: north, south, east, west. Cover the dough between rounds. You’ll see the dough get smoother and stronger each time.
Step 5. Bulk Fermentation (4–6 Hours at Room Temperature, or Overnight in the Fridge)
- After your last stretch and fold, cover the bowl. Let it rise at room temperature (68–72°F is ideal) for 4–6 hours, or place it in the fridge overnight.
- You're looking for:
- Visible growth (not doubled, just noticeably fuller)
- Bubbles that are visible on the surface
- A slight dome on top
Step 7. Shape the Dough
- Lightly flour your dough and work surface and turn the dough out. Carefully shape it into a rectangle. Fold the top third down, then fold the bottom third up and over it. Turn the dough 90 degrees and roll it up like a burrito, applying gentle tension as you go. Don’t crush the air out.
Step 8. Final Proof (1–2 Hours at Room Temperature, or Overnight in the Fridge)
- Dust the shaped dough with rice flour or gluten-free flour (to prevent the dough from sticking to the banneton). Place it seam-side up in your banneton or a bowl lined with a lightly floured towel. Let it proof at room temperature for 1–2 hours until it springs back slowly when you poke it. Or refrigerate it overnight for better flavor and easier handling. The cold dough should still pass the poke test before baking.
Step 9. Preheat the Oven
- Place your Dutch oven (with the lid on) in the oven and preheat it to 450°F. Let it heat for at least 30 minutes so it’s fully hot.
Step 10. Score and Bake
- Place your dough on parchment paper then slash the top with a razor or bread lame at a 30-45 degree angle, using a swift, confident stroke that’s about 1/4 inch deep. This slash guides the bread to expand upward. Place it carefully into the hot Dutch oven. Bake it covered for 30 minutes to trap steam, then uncover and bake it for another 15–20 minutes until it’s deep golden brown. Check that the internal temperature reads 205–210°F with an instant-read thermometer inserted into the center.
Step 11. Cool
- Take the loaf out and let it rest on a wire rack for at least 1 hour before slicing. This lets the inside set. Cutting into it too early will lead to gummy bread. Nobody likes gummy bread.
Last Step:
Please leave a rating and comment letting us know how you liked this recipe! This helps our business to thrive and continue providing free, high-quality recipes for you.Equipment
Notes
Nutrition


Leave a Review!
We LOVE hearing from you! Submit your question or comment here.
Your email address will not be published.