


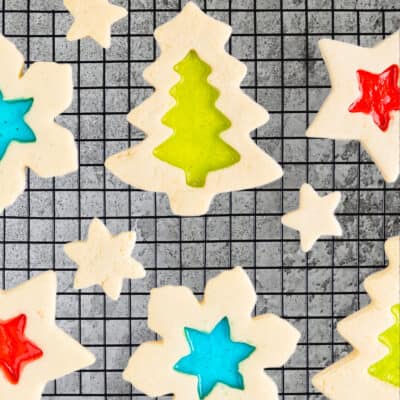
Melted Jolly Ranchers add a beautiful stained glass effect to the center of basic sugar cookies in these Stained Glass Cookies. A beautiful addition to any holiday cookie tray!

Want to impress people with your Christmas cookies? Make these stained glass cookies. They never fail to attract comments about how pretty they are AND how good they taste. No one ever believes me when I say they’re just as easy to make as any other sugar cookie! I often add these to cookie trays next to classics like Toll House chocolate chip cookies and peanut butter blossoms.
Why I Love These Stained Glass Cookies
- They’re so pretty! These cookies are, hands down, one of the prettiest cookies I’ve ever made. The centers really do look like stained glass! They add a beautiful touch to any cookie tray or holiday dessert table.
- Easy to make. Despite looking so fancy, stained glass cookies are very easy to make! All you need is cookie cutters of the same shape in two different sizes to cut out the outside and the center. Otherwise, they’re just like making other cookies!
- Not too sweet. The edges of these cookies are a basic sugar cookie, but Jolly Ranchers add a tart contrast. These are great for those who prefer cookies that aren’t too rich or just want something a little different. I love the combination of the soft sugar cookie and tart center.

Recipe Ingredients
These gorgeous cookies are made with just 7 ingredients. Scroll down to the recipe card below for the exact measurements.
- Butter – For these cookies, be sure to use unsalted butter at room temperature.
- Sugar
- Sea salt – I like to use sea salt over table salt in these cookies. It helps to enhance the overall flavor of the cookies.
- Eggs – Let them come to room temperature ahead of time.
- Vanilla extract
- All-purpose flour – Be sure to measure the flour accurately, as too much or too little will change the dough.
- Jolly Ranchers – Crushed into small chunks so they melt easily. Keep the different colors separate if you want each cookie to be one single color.
How to Make Stained Glass Cookies
Though these cookies look fancy, they are so simple to make. The printable instructions can be found in the recipe card below.


- Make the dough. Cream the butter, sugar, and salt for about 3 minutes until smooth and creamy. Meat in the eggs and vanilla for an additional minute then gradually mix in the flour on medium-low.
- Chill. Wrap the dough in plastic. Chill for at least two hours. I like to separate it into 2 balls so I can work in smaller batches.
- Cut the cookies. Sprinkle flour on the countertop and on the dough ball. Roll the dough to 1/4 inch thick. Use a large cookie cutter to cut cookies and place them on a baking sheet lined with parchment paper. Use a smaller cookie cutter to remove the center, adding that dough back to the dough ball.
- Add the candy. Place the crushed candies in the cut-out of the cookies, nearly filling it full and in an even layer. I find the easiest way to crush hard candies is to add them to a large zip-lock bag and pound them with a meat mallet or rolling pin.
- Bake. Bake for 10-12 minutes, until the edges just begin to brown and the candies are melted. Cool completely on the baking sheet.

Tips & Tricks
Making stained glass cookies for the first time? Here are a few tips!
- Fully cream the ingredients. Since the cookie recipe is so simple, it’s important to not cut corners on mixing. I recommend 3 minutes to cream the butter and sugar – there should be a noticeable difference in texture and color – plus an additional minute for adding the eggs.
- Chill the dough. Chilling the dough for at least two hours is an essential step in this recipe. Warm dough is not only more difficult to work with, it will spread in the oven and ruin the pretty design.
- Use flour as needed. When working with the dough to cut out the cookies, dust it with more flour as needed to prevent it from sticking. I also like to dust the rolling pin with flour.
- Cool on the pan. Do not try to remove the stained glass cookies from the baking sheet until they are fully cooled. If you try to move them before the candy hardens again, it will fall all over the place.
- Try other candies. I love Jolly Ranchers because they come in so many colors and flavors. They really look like stained glass when melted! But other candies can be used in this recipe, such as crushed lollipops, Life Savers, butterscotch, and peppermint candies. Another option is to use colored candy melts. They won’t end up looking like glass window cookies, but it will add a colorful center.
Proper Storage
- Room temperature. Store stained glass cookies in an airtight container at room temperature for 3-4 days. I recommend adding parchment paper between layers and keeping them away from heat and humidity.
- Freezer. They can also be frozen. Just place in a freezer-safe container with parchment paper between the layers. Freeze for up to 3 months.
Stained Glass Cookies
Ingredients
- ¾ cup unsalted butter room temperature
- ¾ cup granulated sugar
- ¼ teaspoon sea salt
- 2 large eggs room temperature and beaten
- 1 1/2 teaspoon vanilla extract
- 2 ½ cups all-purpose flour and ¼ cup, divided
- 2 cups Jolly Ranchers Candies crushed into small chunks
Instructions
Make the Cookie Dough
- Using a stand mixer and paddle attachment cream together softened butter, granulated sugar, and sea salt until smooth and creamy (about 3 minutes). Scrape down sides as needed and continue to mix.
- Add in beaten eggs and vanilla and mix until combined (about 1 minute or so).
- Gradually add in the flour and mix on medium-low until well combined.
- Tightly wrap your dough ball in plastic wrap and chill for at least 2 hours. You can separate it into 2 balls if you prefer to work with smaller batches.
Prepare for Baking
- Pre-heat oven to 350F and prepare a cookie sheet with parchment paper or silicone mat.
- Take your dough out of the fridge.
- Use some of the extra flour to sprinkle on a clean countertop and turn the dough out onto it.
- Sprinkle the dough ball with flour and use a rolling pin to roll the dough out to about ¼ inch thick. Use more of the extra flour as needed to keep the dough from sticking to the counter or rolling pin.
- Use a large cookie cutter to cut out “panes” of cookie dough and transfer them to the prepared cookie sheet.
- Use a smaller cookie cutter out of the panes and remove them, adding them to the extra dough that you will roll out for more cookies, or use them for smaller mini cookies.
- Place crushed hard candies in the cut-out of the cookie dough panes. You want to fill it nearly full with the hard candy crumbs and be sure it is in an even layer, not mounded in the center.
- Bake for 10-12 minutes or until the edges of the cookies just begin to brown and the candies are completely melted.
- Remove from the oven and allow to cool completely on the baking sheet before removing.
Last Step:
Please leave a rating and comment letting us know how you liked this recipe! This helps our business to thrive and continue providing free, high-quality recipes for you.Video
Notes
Nutrition


Leave a Review!
We LOVE hearing from you! Submit your question or comment here.
Your email address will not be published.
4 comments on “Stained Glass Cookies”
These cookies look beautiful. What is the consistency of the center like, though? Seems like it wouldn’t be easy to bite into.
Hi Michelle. The consistency of the pane will be like a hard candy, so yes different than most holiday cookies, but they are beautiful when added to a cookie tray.
I made these stained glass cookies this year for my Christmas trays. They turned out so beautiful thank you for sharing
Thank you Janet!