
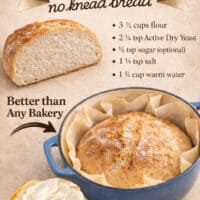
Make a crusty artisan loaf of bread at home with just 10 minutes of prep with this No Knead Dutch Oven Bread recipe. It requires just 4 ingredients and a Dutch oven to prepare, and the single rise means you can have fresh homemade bread on the table in just 3 hours.

This Dutch oven bread recipe is for those who want freshly baked bread but don’t have the time or patience to go through the full process of multiple rise times, kneading, and shaping. Don’t get me wrong, I’ve done both of those things and love the end result, like my classic French bread and sourdough sandwich bread, but sometimes I don’t think about making a fresh loaf of bread to accompany my soup until a few hours before dinner. And sometimes I just like the quick and easy route.
As the name implies, this no knead Dutch oven bread requires no kneading and is baked in a Dutch oven. It’s so ridiculously easy and takes about 10 minutes to prepare. The only bread recipe I’ve ever seen come close to being this easy is crockpot bread. I promise that if you own a Dutch oven, you can make this bread – even if you’ve never quite mastered making other homemade bread. Just be warned that after you make it once, you’ll want to make it all the time!
What Makes Dutch Oven Bread So Special?
- No kneading required. The biggest difference between Dutch oven bread and most homemade breads is that there’s no kneading required. In fact, you don’t even have to touch the dough at any point in the process!
- Only 2 hours of rise time. The second difference is that this bread only needs to rise once and for just 2 hours. This cuts down on the amount of time that is needed to make the bread and results in a denser crumb.
- Ready in 3 hours. With the two above points, it’s no surprise that this no knead bread is much quicker than most homemade bread recipes. It only takes about 10 minutes of active hands-on time to prepare the dough. The rest of the time is inactive rise time and baking time.

Key Ingredients
This easy no knead bread recipe requires just 4 or 5 ingredients, depending if you add the sugar or not. Here’s an overview of what you’ll need and why. Be sure to scroll down to the recipe card at the end of the post for the exact measurements.
- Flour – Regular all-purpose flour is all you need for this bread. There’s no need for fancy bread flour, though if you have it on hand, it does work.
- Active dry yeast – The most important thing with yeast is to make sure it’s fresh. If the yeast isn’t alive, it won’t bloom and the dough won’t rise. So check that expiration date!
- Sugar – While sugar is optional, it is helpful for testing that the yeast is active. That said, it is optional (the yeast will feed on the flour, so it doesn’t need the sugar) and doesn’t impact the overall flavor of the bread.
- Salt – A small amount of salt is key to achieving good flavor in the bread.
- Warm water – The water to activate the yeast should be warm, around 100 degrees or so. I recommend using a meat thermometer to test it as water that’s too hot (over 110F) will kill the yeast and cool water won’t activate it.
How To Make No Knead Bread
Dutch oven bread might just be the easiest bread to make. The full printable instructions can be found in the recipe card below.


- Proof the yeast. Add the yeast, sugar, and salt to a bowl. Whisk in the warm water until everything dissolves. If you added sugar, allow it to sit for 5-10 minutes until foamy.
- Add the flour. Stir in the flour until it comes together in a sticky ball. If it’s too dry, add a tablespoon of water at a time until it sticks together well. If it’s too wet, add a little extra flour until it looks like the dough in the image above.
- Let rise. Cover the dough with a kitchen towel (or foil or plastic). Allow to rest and rise for 2-3 hours somewhere warm.
- Preheat the Dutch oven. Place the Dutch oven, including the lid, on the lowest rack in the oven. Let it preheat with the oven to 450F then continue heating for another 15-20 minutes.


- Transfer the dough. Use a spatula to scrape the dough onto a piece of parchment paper large enough for you to grab the edges and to prevent the dough from touching the sides of the pan. 15X15 is roughly the size I use.
- Shape & cut. Sprinkle a little flour on the dough. Use the parchment paper to shape the dough into your desired shape. If desired, use a sharp knife to cut a design or slit into the dough.
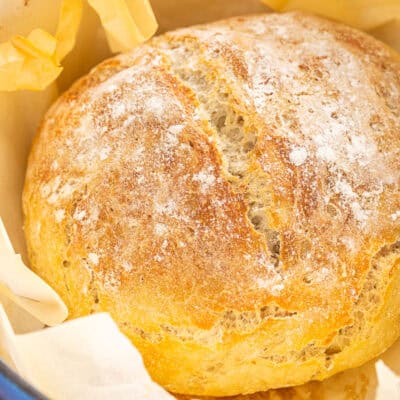
- Bake. Carefully remove the lid of the Dutch oven (while in the oven), place the bread inside the pan with the parchment paper, and place the lid back on. Bake for 20 minutes then remove the lid and bake for an additional 5-10 minutes, until the crust is golden brown.
- Cool. Remove the pan from the oven then use the parchment paper to place the bread on a wire rack. Let cool for at least 20 minutes before slicing and serving.
Preheating The Dutch Oven Is Key!
Preheating the Dutch oven before adding the dough is absolutely necessary when making Dutch oven bread. It needs to be hot throughout, including the lid, so that the dough heats evenly. It also helps to form the crust on the outside of the dough.

Recipe Tips & Tricks
Here are a few helpful tips and tricks for making this no knead Dutch oven bread recipe for the first time.
- The sugar is optional. As mentioned above, in general, you do not need sugar for this recipe as the yeast will feed on the starch in the flour. My first batch ended up a mess because my yeast wasn’t alive. Using a bit of sugar to dissolve the protective coating on the yeast and jump start its activation with the water and salt confirmed that the yeast was alive because it started foaming. If you have brand new yeast, you can just add the water to the yeast and salt, dissolve and immediately add the flour to mix.
- Bake with the lid. Use the dough is placed in the Dutch oven, be sure to return the lid. It’s necessary to seal the heat inside the Dutch oven to create a humid environment for the bread to stay moist on the inside with a nice crust on the outside.
- Don’t overbake. Ovens vary in temperature, so if yours runs hotter, check your bread maybe 5 minutes earlier than the listed time.
- Use parchment paper. Parchment paper is very helpful in this no knead bread recipe because it allows you to move the dough around without actually touching it. The dough is very sticky so it’s difficult to touch directly. The parchment paper also prevents it from sticking to the Dutch oven.
- Don’t mess with the dough. When the dough is rising, leave it alone for the full period. And when transferring it to the parchment paper and shaping it, work with it as little as possible. Not only is kneading not required, it will create a too-dense loaf of bread.
Why Didn’t My No Knead Bread Dough Rise?
The most common culprit behind this dough (and most others) not rising is using yeast that’s no longer active. If the yeast is no longer alive, it won’t multiply and the bread won’t rise.
To prevent this, be sure to check the date on your yeast. This is also why I personally add sugar and wait for it to foam before adding it to the rest of the ingredients.
Another thing that can cause the dough to not rise is using water that’s too hot. Somewhere between 110F and 120F will kill the yeast, so always double check the temperature of the water with a thermometer and ensure it’s around 100F.

Dutch Oven Bread Variations
Once you have the basics of this no knead bread recipe down, you can easily customize the flavor of the loaf by adding a mix-in or two.
Fresh or dried herbs, cheese, and pickled jalapenos or olives (well drained!) are all common additions. Think your favorite herbs and parmesan or spicy cheddar bread with cheddar and jalapenos mixed in.
You can also make a sweet variation on this by adding raisins (soaked in water for a few minutes to re-hydrate them) and cinnamon to the dough.
The key is to choose mix-ins that won’t add a lot of moisture, as that can affect the final texture of the bread.

Ways To Use It
Since no knead bread is so dense, it makes a great pairing for soup and pasta to soak up every bit of broth or sauce. Some of our favorites include Hungarian mushroom soup, roasted carrot soup, shrimp scampi, and marry me chicken pasta.
It’s also a great base for a fancy grilled cheese sandwich or with tuna salad.
Cubes of the bread make a great dipper for party appetizers and can be enjoyed dipped with olive oil and balsamic as an appetizer as well.
Proper Storage
- Room temperature: Dutch oven bread can be stored in an airtight container at room temperature. It’s best enjoyed within 2 days.
- Freezer: For longer storage, you can freeze the bread. I like to slice it first and then freeze it so I can pull individual slices out but you can also wrap the entire loaf in plastic wrap before placing it in an airtight container. Just make sure the bread is completely cool before freezing it.
No Knead Dutch Oven Bread
Ingredients
- 3 ½ cups all-purpose flour
- 2 ¼ teaspoons Active Dry Yeast
- ½ teaspoon sugar optional
- 1 ½ teaspoons salt
- 1 ¼ cup warm water 100 degrees or so, use a meat thermometer to test
Instructions
- Add the yeast, sugar and salt to a medium bowl.
- Add the warm water and whisk until everything is dissolved.
- If you use a little sugar, allow the mix to sit for 5-10 minutes so that it can get foamy. (This step is optional, but I like my bread to have a few air bubbles in it, and it confirms your yeast is alive!) If you don’t use sugar, proceed to the next step without waiting.
- Add the flour and stir it together until it comes together into a sticky dough ball. If it’s too dry, add 1 Tablespoon of water at a time until it sticks together well. If it’s too wet, add a little extra flour at a time until the dough looks like the process image.
- Cover with a piece of foil, plastic or kitchen towel and allow the dough to rest and rise in a warm place for 2-3 hours.
- Adjust your oven racks to accommodate your Dutch Oven, then place it (along with the lid) on the lowest rack and preheat the oven to 450 degrees.
- Once your oven reaches 450 degrees, allow 15-20 more minutes to continue heating.
- Use a spoon or spatula to gently scrape the sticky dough out of the bowl and onto a piece of parchment paper that is approximately 15”x15”. (You want to be able to grab the edges of the parchment and place the bread inside the Dutch Oven and not allow the sides of the dough to touch the sides of the pan directly.)
- Sprinkle a little flour on the dough and use the parchment to gently shape the dough to your liking. Feel free to use a sharp knife to cut a slit or design into the dough before baking. This is optional.
- Once the Dutch Oven has been properly preheated, open the oven door and while using potholders, remove the lid and carefully place the parchment with bread inside pan. Put the lid back into place, (don’t worry about all of the parchment paper being inside the oven) close the oven and bake for 20 minutes, then remove the lid and bake for an additional 5-10 minutes or until the crust is golden brown.
- Remove the pan from the oven, then remove the loaf by grabbing the edges of the parchment paper and place it all on a wire rack to cool for approximately 20 minutes before slicing and serving.
Last Step:
Please leave a rating and comment letting us know how you liked this recipe! This helps our business to thrive and continue providing free, high-quality recipes for you.Video
Notes
Nutrition


Leave a Review!
We LOVE hearing from you! Submit your question or comment here.
Your email address will not be published.