

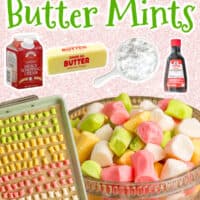
These melt-in-your-mouth Butter Mints are made with just a few ingredients and require no cooking. Easy to customize with any colors or flavors and perfect for sharing!

Like cream cheese candy, butter mints have long been a staple at gatherings like baby showers and weddings. They come in so many colors and are great for sharing. But did you know they’re also super easy to make at home? I love to make a large batch of these at the start of the holiday season and offer them at any gathering, but they are wonderful throughout the year too. The original recipe makes the classic pastel pink, green, and yellow mints, but I included a variation for bright red and green Christmas mints as well.
Why I Love Making This Butter Mint Recipe
- Only 6 ingredients. The primary ingredients to make these mints are butter (obviously), powdered sugar, and heavy cream. Then any flavor extract for choice and optional food coloring. Pretty much anyone can whip these up any time!
- No cooking required. Butter mints require no microwaving, cooking, or baking. Just a mixer and a sharp knife for cutting!
- Shareable. One single recipe makes about 100 mints, which makes these great for sharing at big parties and gatherings.
- Fun & festive. Butter mints are typically pastel colored but they can be customized to any colors! Bright red and green for Christmas, pink and red for Valentine’s Day, pink or blue for baby showers, plain white for weddings…the possibilities are endless!

Recipe Ingredients
These homemade butter mints are made with just a few very simple ingredients. Scroll down to the recipe card below for the exact measurements.
- Butter – Use unsalted butter to fully control the flavor.
- Powdered sugar – Sift first to ensure there are no lumps in the mints.
- Heavy cream – If you don’t have heavy cream, whole milk can be used, but the texture may be slightly different. Dairy-free alternatives like coconut cream can also work.
- Extracts – I use vanilla and peppermint extract for my butter mints. Feel free to use any extract for different flavorings.
- Salt – Helps add flavor to the mints.
- Food coloring – Water-based food coloring works best. I used red, green, and yellow but any colors work.
How To Make Butter Mints
These mints are so easy to make, with no cooking required. Just a mixer! The printable instructions can be found in the recipe card below.


- Beat the butter and sugar. Beat the butter until smooth and creamy. Add in the powdered sugar, one cup at a time, on low speed until fully incorporated.
- Add the other ingredients. Mix in the heavy cream, vanilla, peppermint, and salt until the dough is smooth. If it’s too dry, add a few drops of heavy cream.


- Add the color. Divide the dough into 4 portions. Set one aside. To make pastel pink, green, and yellow, add a tiny drop of food coloring to each of the portions. (One color each.) Knead each one until evenly colored. Add more food coloring as needed to reach the desired color.
- Cut the mints. Roll the dough into thin ropes, approximately ½ inch in diameter. Use a sharp knife to cut ½ inch long pieces.
- Dry. Place the mints on baking sheets lined with parchment paper. They should not be touching. Air dry for 12-24 hours, until firm.

Tips & Variations
Here are a few ways to customize this butter mints recipe, as well as a few general tips.
- Make Christmas mints. To make Christmas-colored mints, use red and green food coloring for two portions of the dough and leave one portion white. Add more food coloring for deeper, vibrant shades.
- Leave them white. If you prefer, you can skip the food coloring entirely and leave all the mints white.
- Switch up the flavor. Swap peppermint extract for other flavors like almond, lemon, orange, or even coconut extract for a different taste.
- Avoid gel food coloring. It can make the dough sticky and harder to work with. Stick to water-based food coloring for best results.
- Drying time varies. If you live in a humid area, the mints may take longer to dry. Use a fan to help speed up the drying process, or place them in a cool, dry room.
- Use mini cookie cutters. This is a great idea for Holidays and parties. Instead of using fondant, make these mints, cut into shapes and add them on top of cakes or any desserts. So many possabilites!

Proper Storage
- Room temperature. Store the butter mints in an airtight container at room temperature for up to 2 weeks.
- Fridge. For longer storage, refrigerate for up to 1 month.
- Freezer. The mints can also be frozen for up to 3 months. They thaw quickly on the counter!

Butter Mints
Ingredients
- ½ cup unsalted butter 1 stick, room temperature
- 4 cups powdered sugar sifted
- 2 Tablespoons heavy cream
- ½ teaspoon vanilla extract
- ½ teaspoon peppermint extract
- ⅛ teaspoon salt
- red, green, and yellow water-based food coloring (optional)
Instructions
- In a large mixing bowl, beat the unsalted butter with a hand or stand mixer until smooth and creamy.
- Gradually add the powdered sugar, one cup at a time, mixing on low speed until fully incorporated.
- Add the heavy cream, vanilla extract, peppermint extract, and salt. Mix until the dough comes together and is smooth. If the dough feels too dry, add a few drops of heavy cream until it reaches a pliable consistency.
- Divide the dough into four equal portions. Leave one portion white and set aside.
- (Optional) For pastel pink, add a tiny drop of red food coloring to one portion and knead until evenly colored. For pastel green, add a small drop of green food coloring to another portion and knead. For pastel yellow, add a small drop of yellow food coloring to the last portion and knead. Adjust the colors by adding more food coloring in tiny increments until the desired shades are achieved.
- Roll each portion of dough into thin ropes, about ½ inch in diameter. Use a sharp knife to cut the ropes into small pieces, about ½ inch long.
- Place the mints on a parchment-lined baking sheet, ensuring they don’t touch. Let them air dry at room temperature for 12-24 hours until firm.
- Once dried, transfer the mints to an airtight container for storage. Enjoy!
Last Step:
Please leave a rating and comment letting us know how you liked this recipe! This helps our business to thrive and continue providing free, high-quality recipes for you.Video
Nutrition


Leave a Review!
We LOVE hearing from you! Submit your question or comment here.
Your email address will not be published.