
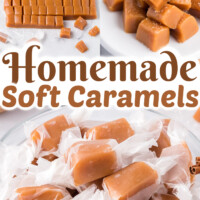


Made with just 6 ingredients, these Homemade Caramels are soft, chewy, and all but melt in your mouth. They have a rich, buttery flavor and make perfect edible gifts for the holiday season. Who wouldn’t love to receive some caramel candy?!

Easy Homemade Caramels Recipe
These homemade caramels are so much better than anything you’ll find in the store. With a combination of white and brown sugar, they have a rich flavor that’s enhanced by butter while corn syrup and evaporated milk give them a creamy, melt-in-your-mouth texture.
Even better, this easy caramel candy recipe comes together in just over an hour, with only half of that being hands-on time. And while caramel may have a reputation for being finicky or difficult to make, this recipe proves otherwise. All you need is a handful of pantry staples and some patience to make some perfect candy. Plus I’ve included all of my best tips below!
I love to make a few batches of soft caramels during the holiday season to give as gifts. It’s a surefire way to put a smile on someone’s face! But I also make sure to keep plenty of extra around the house for snacking and enjoying too.

What You’ll Need
These homemade candies are made with just 6 ingredients and all of them are pantry staples. See the recipe card for the full measurements.
- Butter – I use unsalted butter since salt is also added to the recipe.
- Sugar – I use equal parts granulated white sugar and brown sugar in my caramels. All brown sugar would result in butterscotch.
- Corn syrup – I use light corn syrup, as dark corn syrup has more of a molasses flavor. It helps to keep the caramels soft.
- Evaporated milk – The key ingredient to making caramel.
- Salt – Helps to balance out the sweetness.
- Vanilla extract – Adds a light flavor to the caramel.
How to Make Homemade Caramels
Making caramel candy is likely easier than you think. The process is quite simple, though it does require a lot of careful attention to prevent the mixture from burning.


- Bring the mixture to a boil. Heat butter, sugars, corn syrup, and salt over medium heat until it begins to boil, stirring constantly.
- Add the evaporated milk. Slowly add in the evaporated milk a small amount at a time to ensure it boils continuously. Stir constantly for 10 to 15 minutes, until it reaches 238F on a candy thermometer. Remove from heat and add in the vanilla.
- Cool. Transfer the mixture to a pan lined with parchment paper. Cool in the fridge for at least 30 minutes.
- Cut. Remove the caramel from the pan. Use a sharp knife to cut into squares. Lightly sprinkle with sea salt if desired.

How Can I Tell When The Caramel Is Done?
There are two ways to tell when caramel is done cooking. The first way is to use a candy thermometer and check to make sure it reaches a temperature of 238 degrees F. This is the easiest way but it’s also the most finicky as not all thermometers are calibrated properly and depending on where you are, 238F may not be the perfect temperature.
The other way is to drop a small amount of caramel into a cup of ice water. If you can easily mold it into a pliable ball with your fingers, it’s ready.
I will typically use a candy thermometer to check that the temperature is 238F and then use the ice water test to confirm the caramel is ready.

Tips & Troubleshooting FAQs
While the process is quite easy, homemade caramel candy can be a bit particular. Here are a few tips for achieving soft, chewy caramels each time.
- Add the evaporated milk slowly. It should take about 10 minutes to add all of the evaporated milk to the mixture, as you want it to add just a bit at a time to keep it at a consistent boil. If you add it too quickly, it can curdle and you’ll need to start over again.
- Keep a consistent temperature. Similarly, you’ll want to keep the mixture at an even temperature the entire time it’s boiling, to avoid curdling the mixture or burning it to the pan. You should also stir the whole time.
- Why are my homemade caramels too soft? Not heating the caramel sauce properly will result in too soft candy. This is why it’s important to use both a candy thermometer and the cold water
- Why are my homemade caramels too hard? Similarly, if you overheat the caramel it can become too hard once it sets. 238F-244F seems to be the sweet spot for perfectly soft, chewy caramel candy.

How To Store
Each homemade caramel should be individually wrapped, whether you’ll be keeping them around the house or giving them as gifts. It helps to keep them from drying out and prevent them from sticking together.
To do this, cut wax paper into small pieces, place a caramel in the center, roll it up, and twist the ends to seal.
You can also buy pre-cut pieces of wax paper if you want to cut down on some prep or make sure that each one is cut perfectly straight.
Store at room temperature for 6 to 9 months, though be sure to keep them out of sun and away from moisture. If preferred, you can also store them in the fridge for the same time period.

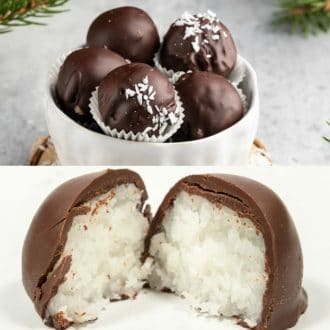
How To Make Cream Caramels
Cream Filling
- 4.5 tablespoons shortening
- 1 ½ cups powdered sugar
- 1 teaspoon vanilla
- ⅔ cup corn syrup
Directions
- Line a 16×12 rimmed baking sheet with parchment paper. Lightly grease the parchment paper.
- In a heavy bottom pan over medium heat the caramel ingredients.
- Bring to a boil and stir constantly until a candy thermometer reads 241-242 degrees.
- Immediately remove from heat and carefully pour out onto your prepared pan. Let cool.
- Make your filling by combing the filling ingredients in a bowl and mixing together using an electric mixer until the mixture forms a thick dough like texture.


- Cut the caramel down the middle and spread out the filling on both halves.
- Roll each half up and slice. Serve!

Can I Freeze Homemade Caramel Candy?
Yes, this homemade caramel does freeze well. Individually wrap them as usual, then place in another freezer safe container. Freeze for up to one year. Thaw on the counter and enjoy.
More Candy Recipes:
- Crockpot Christmas Candy
- Peanut Butter Pretzel Chocolate Clusters
- Crockpot Candy
- Homemade Payday Candy Bars
- Old Fashioned Divinity Candy

Homemade Caramels
Ingredients
- 1/2 cup unsalted butter
- 1 cup granulated sugar
- 1 cup brown sugar
- 1 cup light corn syrup
- 12 ounces evaporated milk
- 1 teaspoon kosher salt
- 1/2 teaspoon vanilla extract
Instructions
- Line an 8×8-inch pan with parchment paper, hanging over the sides just a bit.
- Add the butter, sugars, corn syrup, and salt to a medium saucepan over medium heat. Stir mixture until it begins to boil, about 8 minutes.
- Gradually and slowly add in the evaporated milk, just small amounts while the mixture is boiling and stirring constantly. You will do this for about 10-15 minutes until the mixture reaches "soft ball" stage with a candy thermometer (238 degrees F). A great way to test is to drop a small amount of the caramel sauce in a small cut of ice water. If you can mold it with your fingers into a ball and it's pliable, it's ready. Remove from heat and carefully add in vanilla.
- Pour the caramel mixture into the prepared pan. Cool completely by placing in the fridge for 30 minutes or more. Once firm, remove the caramels from the pan by lifting out the parchment paper.
- Using a sharp knife, cut caramel into squares.
- For gifts, place a caramel in the middle of wax paper, roll up, and then twist the ends to seal.
Last Step:
Please leave a rating and comment letting us know how you liked this recipe! This helps our business to thrive and continue providing free, high-quality recipes for you.Video
Nutrition


Leave a Review!
We LOVE hearing from you! Submit your question or comment here.
Your email address will not be published.
19 comments on “Homemade Caramels”
Can not wait to tackle these recipes! Question… cream caramels, do you start rolling from long side of caramel or shorter side?
Thanks Kathryn. You’ll want to start the roll on the long side so you are rolling toward the shortest part of the caramel. Then slice into small portions.