
We just love these Rice Krispie Animals & Sea Life Creatures using sand molds to make edible treats – so fun!!!
Rice Krispie Animals
I know you are a fan, as am I, of all the amazingly clever food here at Kitchen Fun with My 3 Sons, and I think you’ll like what I create in my kitchen too. My blog, Hungry Happenings, focuses on themed cuisine and edible crafts for holidays and special occasions. Each project I add to my blog includes a step-by-step tutorial and lots of tips so that you can re-create the project in your own home kitchen.
Sand molds are so easy to use! As you can see, these simple plastic toys can be an amazing tool in the kitchen and they are cheap! I’ve bought most of my molds at dollar stores or discount stores.
If you’ve made Rice Krispies Treats before, you know how quickly they come together. Take just a bit more time and you can transform ordinary square treats into fun animals to serve at a party or as an afternoon snack.
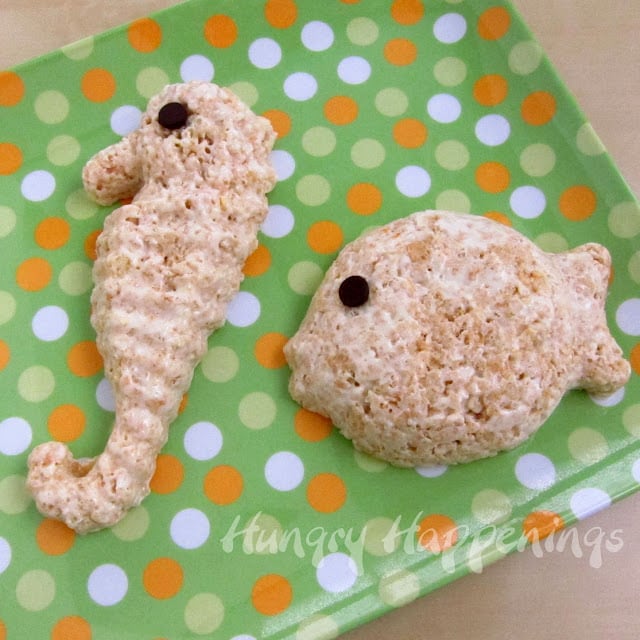
This recipe includes some white chocolate which helps make the cereal treats easier to mold and your animals can be left a nice natural color if you don’t like using food coloring.
If you like, you can even add some sparkle by coating your natural or colored treats in colorful sugar. So many options and they are so easy. Let’s get started..
Rice Krispie Treat Sea Creatures Ingredients
(makes 1 or 2 large or up to 6 small animals)
- 3/4 cups white chocolate chips, 3 tablespoons butter, plus extra to butter hands and supplies
- 10 ounce bag marshmallows (use mini’s if making several different colors)*
- 6 cups Rice Krispies Cereal
*If you want to make several different colors, I recommend making smaller batches using 1/4 cup white chips, 1 tablespoon butter, 2 cups mini marshmallows, 2 cups cereal. It is easier than trying to divide the marshmallow mixture once it’s melted.
Optional Ingredients:
- food coloring
- colorful sanding sugar
- chocolate chips (1 or 2 per animal, as needed)
Supplies Needed:
- plastic wrap
- mixing bowl
- large rubber spatula or spoon
- food handling gloves (optional)
- assorted sand molds
How To Make Rice Krispie Animals
Line your sand molds with a piece of plastic wrap. Butter your spatula or spoon, and ultimately your hands or your gloved hands.
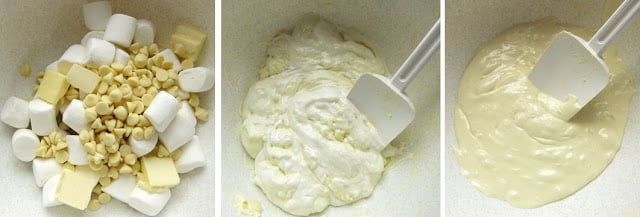
In a microwave safe bowl heat white chocolate chips, butter, and marshmallows on high for 45 seconds. Return to microwave and heat for 30 seconds, then stir. If the marshmallows and chocolate aren’t melted, return to microwave and heat for 15 second increments, stirring after each, until melted.
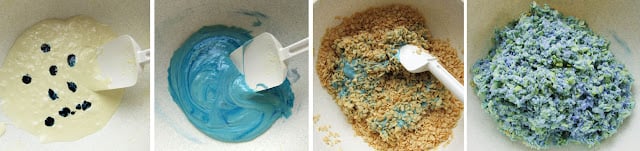
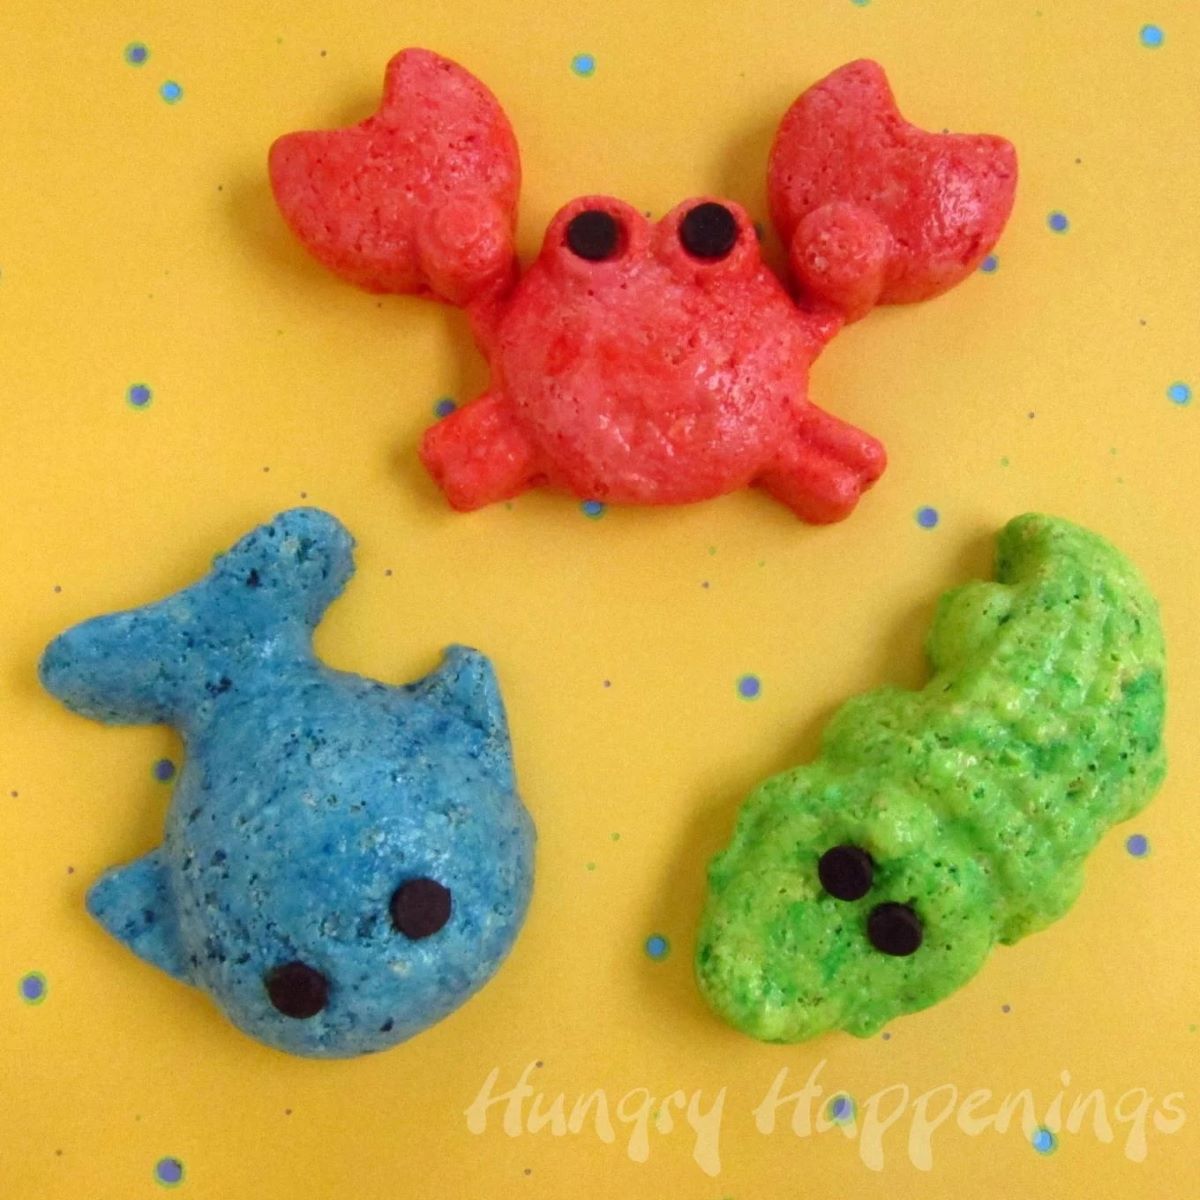
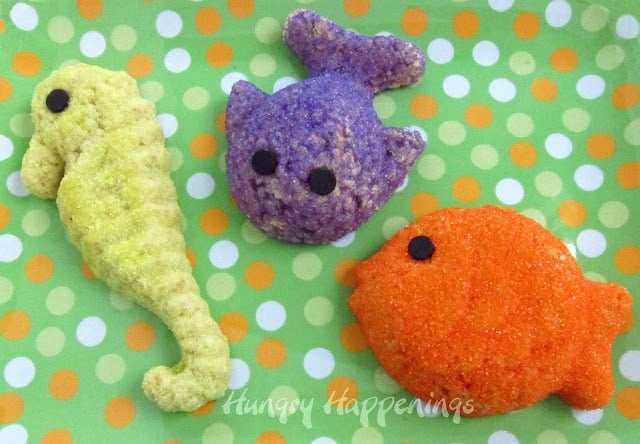
If adding color and you want just one color, add food coloring to large batch of marshmallow mixture and stir. Add more coloring until you reach the desired shade. Stir in Rice Krispies until well blended.
*If making smaller batches so you can use a variety of colors, melt 1/4 cup white chips, 1 tablespoon butter, 2 cups mini marshmallows for 30 seconds in microwave. Stir in food coloring. If not completely melted, heat for 10 second increments until melted. Stir in 2 cups cereal.
Adding The Mixture Into The Molds
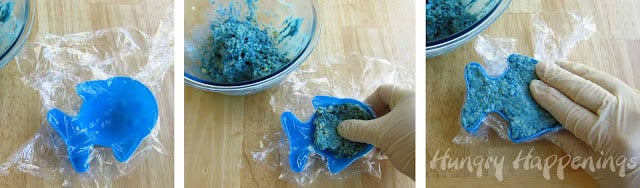
Spoon some of the natural or colored cereal mixture into one of your molds. Add more cereal as needed, pressing down firmly to compact it in the mold. Press it flat on top, removing any cereal that hangs over the mold.
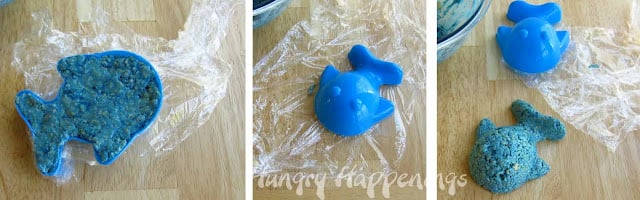
To un-mold, turn the mold upside down and pull on the plastic wrap being careful with the smaller detailed areas. Remove the plastic wrap.
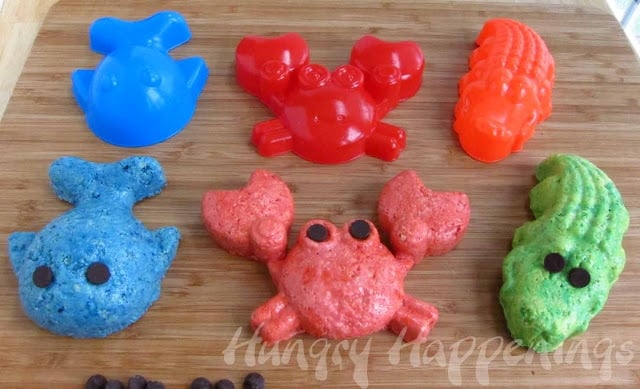
To add character to your animals, add chocolate chips for eyes.
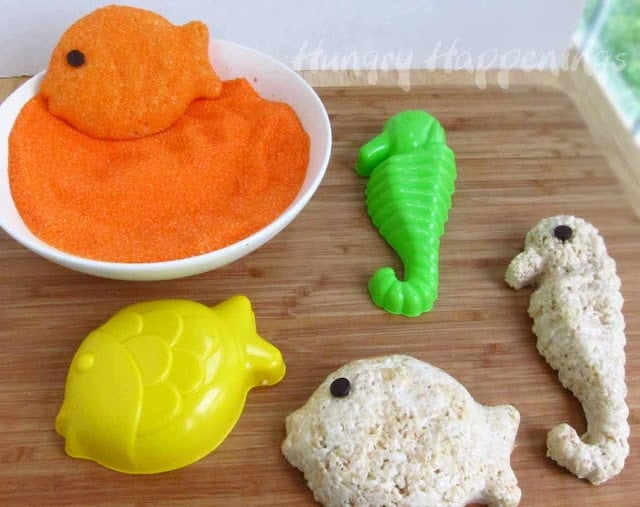
To add sparkle, press colored sugar onto your cereal treats. I filled a bowl with colored sugar and pressed an animal face down into the sugar. It stuck nicely.
If you like this recipe, I’m sure you’ll find many other fun projects at Hungry Happenings. So, stop by and take a look around. Thanks to Jill for inviting me to share this post as a guest of Kitchen Fun with My 3 Sons.
Have a sweet day – Beth
Other Fun Beach Themed Treats…

Rice Krispie Animals & Sea Life Creatures!
Ingredients
- 3/4 cups white chocolate chips
- 3 tbsp butter plus extra to butter hands and supplies
- 10 oz bag marshmallows use mini's if making several different colors
- 6 cups Rice Krispie Cereal
Instructions
- Line your sand molds with a piece of plastic wrap. Butter your spatula or spoon, and ultimately your hands or your gloved hands.
- In a microwave safe bowl heat white chocolate chips, butter, and marshmallows on high for 45 seconds. Stir with a buttered rubber spatula or spoon. Return to microwave and heat for 30 seconds, then stir. If the marshmallows and chocolate aren't melted, return to microwave and heat for 15 second increments, stirring after each, until melted. Note: you can also melt it in a saucepan set over low heat on the stove.
- If adding color and you want just one color, add food coloring to large batch of marshmallow mixture and stir. Add more coloring until you reach the desired shade. Stir in Rice Krispies until well blended.*If making smaller batches so you can use a variety of colors, melt 1/4 cup white chips, 1 tablespoon butter, 2 cups mini marshmallows for 30 seconds in microwave. Stir in food coloring. If not completely melted, heat for 10 second increments until melted. Stir in 2 cups cereal.
- Spoon some of the natural or colored cereal mixture into one of your molds. Use your buttered hands or gloved and buttered hands to press the mixture into the mold. Add more cereal as needed, pressing down firmly to compact it in the mold. Press it flat on top, removing any cereal that hangs over the mold.
- To un-mold, turn the mold upside down and pull on the plastic wrap being careful with the smaller detailed areas. Remove the plastic wrap.
Last Step:
Please leave a rating and comment letting us know how you liked this recipe! This helps our business to thrive and continue providing free, high-quality recipes for you.Nutrition

Leave a Review!
We LOVE hearing from you! Submit your question or comment here.
Your email address will not be published.
19 comments on “Rice Krispie Animals & Sea Life Creatures!”
Amazing, as always. Great ideas!
So fun! My kids would love these! I am pinning these to remember for our beach trip coming up! Thanks for sharing at our Handmade Tuesdays party this week.
These are so fun! My boys would love them especially after our trip to the beach!
These are too cute! I don't have kids, but that won't stop me from making this treat for myself 😉
You are sooooooooooo creative – I admire that very much!
These are super cute and adorable
Brilliant idea!
Oh my goodness! I love that cute little crab!
So cute! Definitely going to have to try these with my son!
I absolutely love them, they are so cute!! One recipe I will have to try with the kiddos, thanks for sharing!!
Nicole