

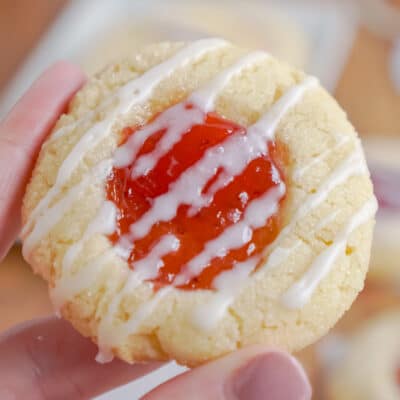
Looking for the perfect easy-to-make dessert? Look no further than these delicious Strawberry Thumbprint Cookies! These are soft, buttery shortbread cookies filled with strawberry jam and drizzled with sweet vanilla glaze. You’re on your way to sweet, sugary heaven!

If you love the sweet strawberry flavors in these thumbprint cookies, you’ll also love these strawberry cake mix cookies and my strawberry champagne cookies!
Strawberry Jam Thumbprint Cookies
You’re going to love these Amazing Strawberry Jam Thumbprint Cookies! Also try our Jam Thumbprint Cookie and Apricot Walnut Thumbprint Cookies, they are so easy to make and taste delicious.
These cookies are perfect for any occasion, whether you need a quick dessert or something sweet to bring over to your neighbor. The jam gives them an extra burst of flavor that will have everyone coming back for more. Plus, they look super cute with the little thumbprints in the center!

What are Thumbprint Cookies?
Thumbprint cookies are a type of shortbread cookie that gets its name from the indentation made in the center of each cookie. This indentation is typically filled with jam, frosting, or another type of filling.

Key Ingredients
- Strawberry Jam or Preserves – This is what goes inside the indent of the cookie. You want a good-tasting strawberry preserve. Make sure it is something that you like because it is a key component of the cookies.
- Lemon Juice – The lemon juice is used in the glaze. Lemon and strawberry flavors go perfectly together. This brings the cookies together for the best flavor.
How to Make Strawberry Thumbprint Cookies
Follow these short steps to make delicious strawberry jam cookies. Don’t forget to scroll down to the recipe card for printable instructions.


- Combine the wet ingredients. Add the butter and 2 cups of sugar to a bowl and combine using a hand mixer or standing mixer. (place 1/2 cup of sugar aside to roll the cookie dough in) Put in the vanilla, egg, and egg yolk and combine.


- Add the dry ingredients. Gradually add in the flour, baking powder, salt, and baking soda and combine until fully incorporated. Place the dough in the fridge for 30 minutes to chill.
- Form the dough. Set the oven to 375 degrees and use parchment paper to line a baking sheet. Scoop the dough using a cookie scoop (1 tablespoon), roll it into balls, and arrange them 2 inches apart on the prepared baking sheet.


- Add the strawberry jam. Create an indentation into the cookie dough using 1/2 a teaspoon or your thumb. Fill the well with the strawberry preserves and top with sugar.


- Bake. Place the cookies into the oven for 9-10 minutes until the edges are golden brown. Take out and allow the cookies to cool thoroughly on the baking sheet while you make the glaze.
- Glaze. Add all of the ingredients into a small bowl and drizzle on top of the cookies, serve, and enjoy!
Can These Be Made Ahead?
Yes! The cookies themselves can be made ahead of time and stored in an airtight container for up to 5 days or frozen for 2 months. They will soften slightly but still taste delicious. Once you’ve filled the thumbprints with jam, store them separately in an airtight container (not plastic wrap). Assemble them right before serving.
How to Freeze Thumbprint Cookies?
Freeze the cookies on a baking sheet for 1-2 hours. Once they are frozen solid, transfer them to a Ziploc bag and store in the freezer. They will keep for 2-3 months.

More Thumbprint Cookies
- Jam Thumbprint Cookies
- Chocolate Thumbprint Cookies
- Lemon Thumbprint Cookies
- Shortbread Thumbprint Cookies

Strawberry Thumbprint Cookies
Ingredients
- 1 cup unsalted butter softened (2 sticks)
- 2 1/2 cups granulated sugar divided
- 2 teaspoons pure vanilla extract
- 1 egg
- 1 egg yolk
- 3 cups unbleached flour
- 1 teaspoon baking powder
- 1/2 teaspoon table salt
- 1/4 teaspoon baking soda
- 1/2 cup strawberry jam or preserves of your choice
Glaze Ingredients:
- 1 cup powdered sugar
- 2 teaspoons lemon juice
- 1-2 teaspoons water (I used 1.5 teaspoons for the perfect consistency)
Instructions
- With a hand mixer or stand mixer, beat butter and 2 cups of sugar together (save the other 1/2 cup for rolling cookie balls in).
- Add vanilla, egg, and egg yolk.
- Slowly mix in flour, baking powder, salt, and baking soda.
- Chill dough for 30 minutes.
- After the dough is chilled, preheat the oven to 375 degrees and line a baking sheet with parchment paper.
- Using a 1 tablespoon cookie scoop, create cookie balls and roll them in the remaining sugar before placing them 2” apart on the baking sheet.
- Using a 1/2 teaspoon, or your thumb, create a bowl on the top of the cookie.
- Fill with jam or fruit preserves (I used strawberry) and sprinkle with sugar.
- Bake for 9-10 minutes or until the edges start to brown a little.
- Let cookies cool completely on the baking sheet.
- Make the glaze by mixing all of the ingredients and drizzle glaze over cookies.
Last Step:
Please leave a rating and comment letting us know how you liked this recipe! This helps our business to thrive and continue providing free, high-quality recipes for you.Notes
- If your cookies spread more than you’d like them to, or if your fruit “thumbprint” isn’t centered, you can add more jam or preserves after baking while the cookies are still hot.
- The glaze is optional. If you don’t like lemon, just use water instead of lemon juice.
Nutrition


Leave a Review!
We LOVE hearing from you! Submit your question or comment here.
Your email address will not be published.